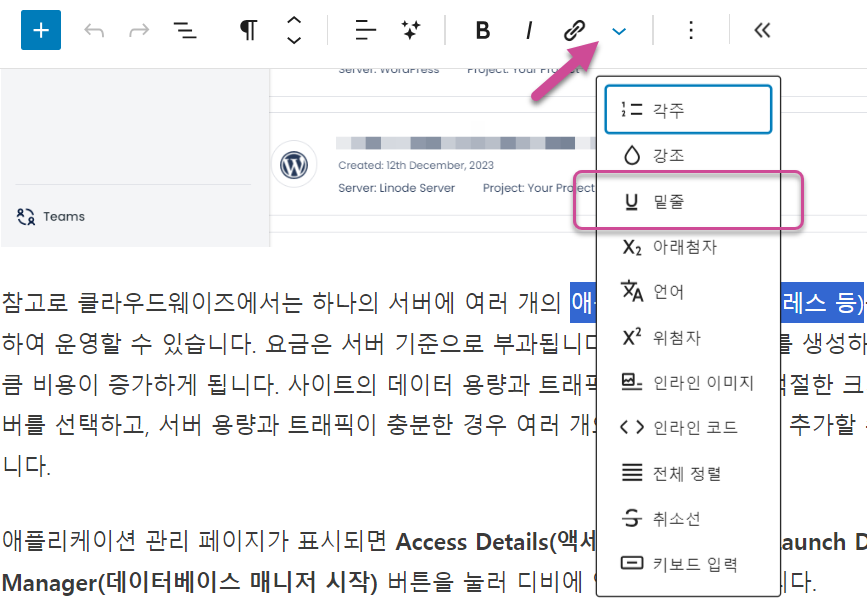
WordPress ブロックエディタでテキストに下線を引くには、Ctrl + Uショートカットを使用できます。ショートカットが機能しない場合は、段落ブロックの[その他]アイコン(v字型アイコン)をクリックして下線を適用することもできます。

WordPress ブロックエディタで本文に下線を引くと自動的に 蛍光ペン(強調表示)効果を与える方法を見てみましょう。
WordPress テキストの下線に蛍光ペン効果を与える方法
WordPress ブロックエディタ(Gutenberg)で下線を引くと、自動的に蛍光ペン効果が適用されるようにしたい場合は、以下の方法で試すことができます。
まず、次のJavaScriptコードを追加します。
<script>
document.addEventListener('DOMContentLoaded', function() {
  document.querySelectorAll('.entry-content span').forEach(function(span) {
    if (span.style.textDecoration === 'underline') {
      span.removeAttribute('style'); // Remove the inline style
      span.setAttribute('class', 'custom-highlight'); // Use the class 'custom-highlight'
    }
  });
});
</script>
上記のコードは、 GeneratePress などを含むほとんどのテーマでうまく機能します。しかし、 Newspaper など、一部のテーマでは動作しない場合があります。そのような場合は、entry-contentクラスの部分をチェックして適切に変更したり、.entry-contentを削除したりできます。
簡単には WPコードなどのプラグインを使用して、フッターセクションに上記のコードを追加できます。
サイトの速度に影響が少ないように追加したい場合は、上記のコードの先頭行와 맨 끝줄의 を削除して チャイルドテーマ フォルダにjsファイルとして保存するようにします。
JSファイル Naver カフェに投稿しました。ダウンロードして/wp-content/themes/チャイルドテーマ_フォルダ/js/ディレクトリにアップロードしてください。
その後、チャイルドテーマ関数ファイルに次のコードを追加できます。
/ WP-コンテンツ/themes/child-theme-folder/js/custom-highlight.js ファイルとしてJavaScriptファイルを保存した場合:
// Enqueues the 'custom-highlight.js' script exclusively on single post pages.
// This function first checks if the current page being viewed is a single post using is_single().
// If true, it registers 'custom-highlight.js', located within the child theme's 'js' directory, and sets jQuery as a dependency.
// The script is then enqueued to be loaded in the footer of the page, ensuring it is executed after the page content has loaded.
// This targeted loading approach optimizes site performance by loading the script only where it is needed.

function enqueue_custom_highlight_script() {
    if (is_single()) {
        // Register the script
        wp_register_script('custom-highlight-script', get_stylesheet_directory_uri() . '/child-theme/js/custom-highlight.js', array('jquery'), '', true);

        // Enqueue the script
        wp_enqueue_script('custom-highlight-script');
    }
}
add_action('wp_enqueue_scripts', 'enqueue_custom_highlight_script');
上記のコードを追加すると、ブログ投稿の本文に適用された下線にのみ蛍光ペン効果が適用されます。
そして ルックス » カスタマイズ » 追加 CSSに次のカスタムコードを追加します。
/* Applies a gradient background to elements with the 'custom-highlight' class,
   creating a unique highlighting effect. The gradient starts with a solid yellow (#FFEB3B)
   color at the bottom, covering the lower 33% of the element, and transitions to transparent
   at the 25% mark from the bottom. This creates an overlap in the gradient effect,
   which may not render as expected due to the reverse percentages. Adjust the transparent
   percentage to be greater than 33% for a more conventional gradient effect where the color
   smoothly transitions from yellow to transparent upwards. */

.custom-highlight {
  background: linear-gradient(to top, #FFEB3B 33%, transparent 25%);
}
色と透明度は適切に変更します。
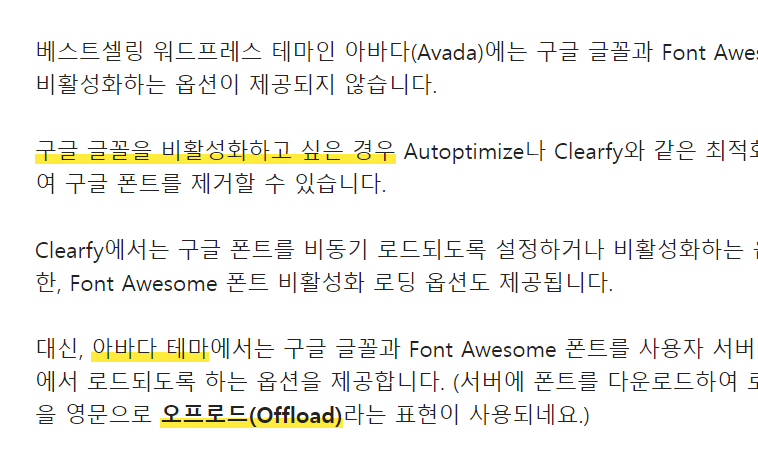
ポストボディに適用された下線は、次のように黄色の蛍光ペンで表示されます。

サイトの速度が遅い場合は、下線が表示され、黄色の蛍光ペン効果に変わります。
色を変更したい場合は、CSSコードで色を適切に変更してください。下線に自動的に蛍光ペン効果を与えたくない場合は、テーマ関数ファイルに追加したコードを削除するだけです。

コメントを残す