WordPressでは、テーマファイルを変更して、特定のカテゴリページまたはタグページのレイアウトを異なる方法で飾ることができます。 最近では WordPress 通知パネル内で特定のカテゴリ/タグテンプレートを作成できるように進化しています。 エレメンプロナ Avada またはDiviなどのフルサイト編集機能を提供するページビルダーまたはテーマを使用すると、管理者ページ内でサイトのすべてのセクションを簡単にカスタマイズできます。
このブログで使用された GeneratePress テーマの有料版でも、Elementsを通じて同様の機能を提供します。 ループテンプレートを作成して、特定のカテゴリページまたはタグページに異なるレイアウトを作成できます。
GeneratePress テーマ:カテゴリ/タグテンプレートレイアウトのカスタマイズ方法
GeneratePress テーマの カスタマイズするでアーカイブページに設定するレイアウトは、すべてのアーカイブページ(ブログページ、すべてのカテゴリページ、タグページなど)に適用されます。
特定のカテゴリページやタグページに異なるスタイルを適用したい場合は、ループテンプレートを作成して飾ることができますが、この記事ではテーマファイルを変更してカテゴリ/タグページレイアウトをカスタマイズする方法について説明します。
WordPress カテゴリテンプレートとタグテンプレート
GPテーマにおけるカテゴリテンプレートとタグテンプレートのレイアウトは、 ルックス » カスタマイズ » Layout » Blog セクションで指定した設定で表示されます。
ここで設定したレイアウトは、ブログページ、カテゴリページ、タグページなど、すべてのアーカイブページに適用されます。
特定のカテゴリページまたはタグページにのみ異なるレイアウトを適用したい場合は、前述のように GPプレミアムを使用している場合は、ループテンプレートを作成して飾ることができます("ジェネレートプレステーマ:Newsroom(ニュースルーム)スキンホームポストグリッドを設定する「注。)
WordPressの標準的な方法では、テーマファイルを編集してカテゴリやタグページのレイアウトを設定できます。
WordPressの公式文書 Category Templatesによると、カテゴリテンプレートは次のテンプレートファイルの対象となります。
- category-slug.php
- category-ID.php
- category.php
- archive.php
- index.phpを
つまり、特定のカテゴリページを読み込む場合 WordPressまず、category-slug.phpファイルがあるかどうかをチェックします。 このファイルがない場合はcategory-ID.phpファイルをチェックし、それがない場合はcategory.phpファイルを見つけます。 category.php ファイルがない場合は archive.php ファイルを、このファイルがない場合は Index.php ファイルを探します。
GeneratePress テーマの場合、テーマフォルダを見るとcategory.phpファイルがないため、archive.phpファイルからカテゴリページが読み込まれます。

タグテンプレート同じです。
- tag-slug.php
- tag-id.php
- タグ.php
- archive.php
- index.phpを
カテゴリ/タグテンプレートレイアウトのカスタマイズ方法
このブログでは、 落書き帳カテゴリを除くすべてのカテゴリページは、最近の投稿(ブログ)ページのレイアウトと同じです。 また、タグページのレイアウトも異なる構成にしました。
すべてのカテゴリのレイアウトを異なるものにしたい場合は、次の方法で進めることができます。
- チャイルドテーマを作成して有効にします。
- 親テーマフォルダ内のarchive.phpファイルをコピー(移動しない)してチャイルドテーマフォルダにアップロードします。
- archive.phpファイルの名前をcategory.phpに変更し、必要に応じて変更します。
特定のカテゴリページのレイアウトだけを異なる設定にしたい場合は、archive.phpファイルをcategory-slug.phpまたはcategory-ID.php(例:category-102.php)に変更した後に修正する必要があります。
タグテンプレートも同じです。 archive.php ファイルを tag.php ファイルに変更して編集すると、すべてのタグページに変更されたスタイルが適用されます。 tag-slug.phpまたはtag-ID.phpで名前を変更すると、特定のタグページにそのスタイルが反映されます。
上記の作業を行うには、FTP/SFTPに接続できる必要があります。 FTPにアクセスする方法がわからない場合は、ご利用のウェブホスティング会社にお問い合わせください。
タグテンプレートの例
このブログでは、タグページは次の図のようにリストとして表示されるように変更しました。
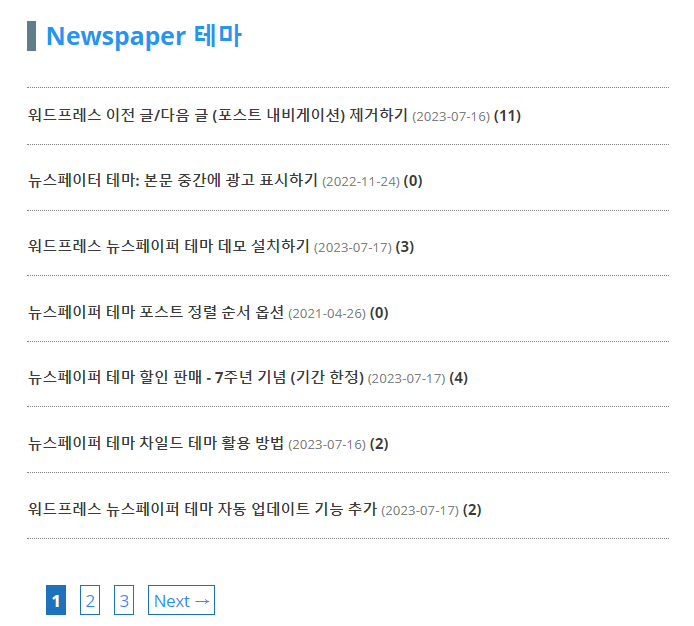
上の写真は Newspaper テーマタグページのレイアウトを見せています。 このようにしたい場合は、チャイルドテーマにtag.phpファイルを作成し、次のコードを追加できます。
<?php
/**
 * The template for displaying Archive pages  of the GeneratePress theme.
 *
 * @package GeneratePress
 */

// If this file is called directly, abort.
if ( ! defined( 'ABSPATH' ) ) {
	exit; // Exit if accessed directly.
}

// Include the header file from your theme's directory
get_header(); ?>

	<!-- Begin the main content area -->
	<div <?php generate_do_attr( 'content' ); ?>>

		<!-- Main tag for the content -->
		<main <?php generate_do_attr( 'main' ); ?>>
			<?php
			// This action hook is used to add custom functions before the main content
			do_action( 'generate_before_main_content' );

			// Checks if there are any posts that match the query
			if ( generate_has_default_loop() ) {
				if ( have_posts() ) :
					// Do actions specific to the archive title
					do_action( 'generate_archive_title' );
					// Do actions before the loop
					do_action( 'generate_before_loop', 'archive' );

					// The WordPress Loop: loads post content
					while ( have_posts() ) : the_post(); ?>

						<!-- Each post is displayed within an article tag -->
						<article id="post-<?php the_ID(); ?>" <?php post_class(); ?> <?php generate_do_attr( 'article' ); ?>>
							<div class="inside-article">
								<header class="entry-header">
									<!-- Display the post title and a link to the post -->
									<h2 class="entry-title">
										<a href="<?php the_permalink(); ?>" title="<?php the_title_attribute(); ?>"><?php the_title(); ?></a>
										<!-- Display the date when the post was last modified -->
										<span>(<?php echo get_the_modified_date('Y-m-d'); ?>)</span>
										<!-- Display the number of comments on the post -->
										(<?php comments_number( '0', '1', '%' ); ?>)
									</h2>
								</header>
							</div>
						</article>

					<?php endwhile;

					// Do actions after the loop
					do_action( 'generate_after_loop', 'archive' );

				else :
					// If no content, include the 'No posts found' template
					generate_do_template_part( 'none' );
				endif;
			}

			// This action hook is used to add custom functions after the main content
			do_action( 'generate_after_main_content' );
			?>
		</main>
	</div>

	<?php
	// This action hook is used to add custom functions after the primary content area
	do_action( 'generate_after_primary_content_area' );

	// Constructs the sidebars if they are enabled in the theme options
	generate_construct_sidebars();

	// Include the footer file from your theme's directory
	get_footer();
?>
そしてスタイルはCSSを介して調整されます。
/* 태그 아카이브 */
body.tag h2.entry-title {
    font-size: 0.9em;
    padding-bottom: 20px;
    border-bottom: 1px dotted gray;
}

body.tag h2.entry-title a {
    color: #3c3c3c;
}

body.tag h2.entry-title a:hover {
    color: #2196F3;
}

body.tag article {
    margin-bottom: 0px;
}

body.tag #main > header.page-header + article .entry-title {
    border-top: 1px dotted gray;
    padding-top: 20px;
}

body.tag header.page-header {
    display: block !important;
    padding-left: 20px !important;
}

body.tag header.page-header h1 {
    font-size: 1.5em;
    color: #2196F3;
    border-left: 10px solid #607D8B;
    padding-left: 10px;
	margin-bottom: -20px !important;
}


/* article date */
body.tag article .entry-title span {
    color: gray;
    font-weight: normal;
    font-size: 0.9em;
}
上記のコードを ルックス » カスタマイズ » 追加 CSSに追加します。 スタイルを異なる設定にしたい場合は、上記のコードを適切に変更できます。 基本的なCSSを知っていれば、難しくないようにスタイルを好きなように変更できるはずです。
上記の方法でtag.phpファイルを追加すると、投稿タイトル(日付)(コメント数)"フォーマットで表示されます。不要な要素がある場合は、上記のPHPコードからその要素を削除できます。
最後に、
以上で WordPress GeneratePress テーマで特定のカテゴリやタグページのレイアウトをカスタマイズする方法について説明しました。 上記の方法は、GPテーマだけでなく他のテーマでも同様に適用されます。
上記のプロセスは初心者には難しいので、初心者の場合はエレメントプロ(Elementor Pro)私 Avada またはDiviテーマ などが提供するフルサイト編集(FSE)機能を使用すると、特定のセクション(カテゴリページ、タグページ、 WooCommerce 商品ページ、商品カテゴリ、ポストテンプレートなど)を自由に変更できます。

コメントを残す