はじめ
WooCommerce 2.1以降、「マイアカウント」ページの登録フォームをカスタマイズできます。 以下の内容は ウーthemes Support サイトの内容を移したのです。
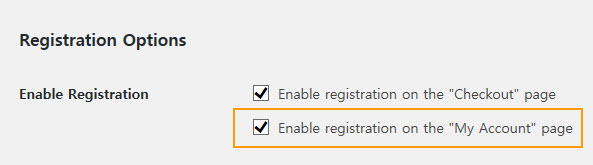
「マイアカウント」 ページの登録フォームにフィールドを追加するには、まず「登録」を有効にする必要があります。
WordPress ダッシュボードから WooCommerce >設定 ページに移動した後にアカウント(Accounts)]タブを選択します。 次に Registration Options(登録オプション)の 「Enable Registration(登録を有効にする)」から Enable registration on the "My Account" pageをチェックします。
基本的に「マイアカウント「ページは次のように表示されます。
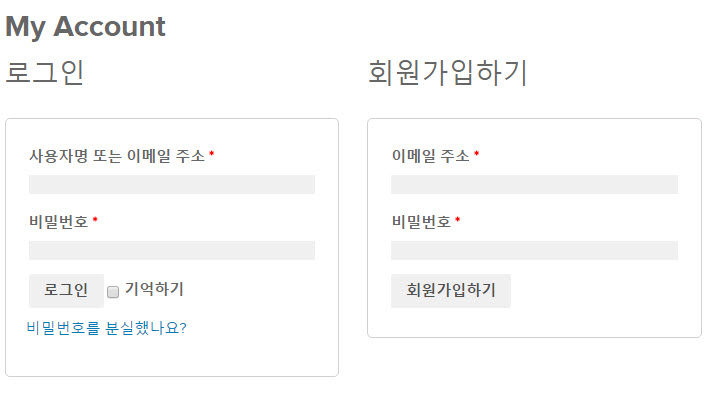
上図のように」メールアドレス「と」비밀번호「のみ表示されます。
新しいフィールドを追加する
「マイアカウント」では、会員登録フォームには基本的にXNUMXつのフィールドしかなく、簡単に会員登録が可能になっています。 追加フィールドを指定するには、次のアクションを使用できます。
- woocommerce_register_form_start - 「Eメールアドレス」フィールドの後に表示されます。
- woocommerce_register_form - 「パスワード」フィールドの後に表示されます。
たとえば、次のコードを使用して、「名前」、「姓」、「電話番号」フィールドを追加できます。
/**
* Add new register fields for WooCommerce registration.
* WooCommerce 등록 폼에 새로운 필드 추가
*
* @return string Register fields HTML.
*/
function wooc_extra_register_fields() {
?>

<p class="form-row form-row-first">
<label for="reg_billing_first_name"><?php _e( 'First name', 'woocommerce' ); ?> <span class="required">*</span></label>
<input type="text" class="input-text" name="billing_first_name" id="reg_billing_first_name" value="<?php if ( ! empty( $_POST['billing_first_name'] ) ) esc_attr_e( $_POST['billing_first_name'] ); ?>" />
</p>

<p class="form-row form-row-last">
<label for="reg_billing_last_name"><?php _e( 'Last name', 'woocommerce' ); ?> <span class="required">*</span></label>
<input type="text" class="input-text" name="billing_last_name" id="reg_billing_last_name" value="<?php if ( ! empty( $_POST['billing_last_name'] ) ) esc_attr_e( $_POST['billing_last_name'] ); ?>" />
</p>

<div class="clear"></div>

<p class="form-row form-row-wide">
<label for="reg_billing_phone"><?php _e( 'Phone', 'woocommerce' ); ?> <span class="required">*</span></label>
<input type="text" class="input-text" name="billing_phone" id="reg_billing_phone" value="<?php if ( ! empty( $_POST['billing_phone'] ) ) esc_attr_e( $_POST['billing_phone'] ); ?>" />
</p>

<?php
}

add_action( 'woocommerce_register_form_start', 'wooc_extra_register_fields' );
ちなみに"billing_*"としてフィールドを使用して後で WooCommerceで、顧客アカウントのフィールドと接続することができます。
次のようなフィールドを使用することができます。
- billing_first_name
- billing_last_name
- billing_company
- billing_address_1
- billing_address_2
- billing_city
- billing_postcode
- billing_country
- billing_state
- billing_email
- billing_phone
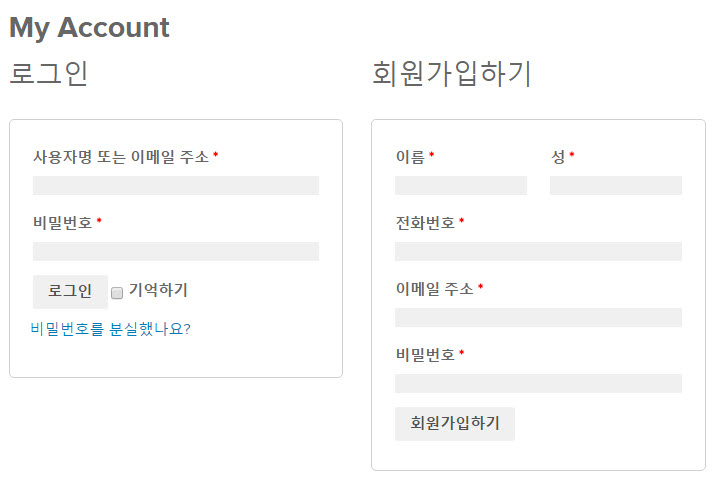
上記のコードを使用している WordPress 関数ファイルに追加すると、次のように変わります。
カスタムフィールドの検証
ユーザーがすべてのフィールドを埋めるために検証をすることが重要です。 この機能のために woocommerce_register_post アクションを使用することができます。
以下は、検証例です。 (参考までに、検証コードを入れなくても、フィールドを満たさないと、エラーメッセージが表示されるようです。このコードを使用する前にテストしてみてください。)
/**
* Validate the extra register fields.
* 추가 등록 필드 유효성 검사
*
* @param  string $username          Current username 현재 ユーザー명.
* @param  string $email             Current email 현재 이메일.
* @param  object $validation_errors WP_Error object.
*
* @return void
*/
function wooc_validate_extra_register_fields( $username, $email, $validation_errors ) {
if ( isset( $_POST['billing_first_name'] ) && empty( $_POST['billing_first_name'] ) ) {
$validation_errors->add( 'billing_first_name_error', __( '<strong>Error</strong>: First name is required!', 'woocommerce' ) );
}

if ( isset( $_POST['billing_last_name'] ) && empty( $_POST['billing_last_name'] ) ) {
$validation_errors->add( 'billing_last_name_error', __( '<strong>Error</strong>: Last name is required!.', 'woocommerce' ) );
}
if ( isset( $_POST['billing_phone'] ) && empty( $_POST['billing_phone'] ) ) {
$validation_errors->add( 'billing_phone_error', __( '<strong>Error</strong>: Phone is required!.', 'woocommerce' ) );
}
}

add_action( 'woocommerce_register_post', 'wooc_validate_extra_register_fields', 10, 3 );
カスタムフィールドを保存する
もう最後にカスタムフィールドをデータベース(DB)に保存する必要があります。
ユーザープロファイルにカスタムフィールドを保存する必要があり、この機能は、 woocommerce_created_customer アクションを使用するようにします。
/**
* Save the extra register fields.
* 추가 등록 필드 저장하기
*
* @param  int  $customer_id Current customer ID 현재 고객 ID.
*
* @return void
*/
function wooc_save_extra_register_fields( $customer_id ) {
if ( isset( $_POST['billing_first_name'] ) ) {
// WordPress default first name field WordPress 기본 ユーザー '이름' 필드.
update_user_meta( $customer_id, 'first_name', sanitize_text_field( $_POST['billing_first_name'] ) );

// WooCommerce billing first name WooCommerce 청구지 ユーザー '이름'.
update_user_meta( $customer_id, 'billing_first_name', sanitize_text_field( $_POST['billing_first_name'] ) );
}

if ( isset( $_POST['billing_last_name'] ) ) {
// WordPress default last name field WordPress 기본 ユーザー '성' 필드.
update_user_meta( $customer_id, 'last_name', sanitize_text_field( $_POST['billing_last_name'] ) );

// WooCommerce billing last name WooCommerce 청구지 ユーザー '성'.
update_user_meta( $customer_id, 'billing_last_name', sanitize_text_field( $_POST['billing_last_name'] ) );
}

if ( isset( $_POST['billing_phone'] ) ) {
// WooCommerce billing phone WooCommerce 청구지 전화번호
update_user_meta( $customer_id, 'billing_phone', sanitize_text_field( $_POST['billing_phone'] ) );
}
}

add_action( 'woocommerce_created_customer', 'wooc_save_extra_register_fields' );
これで、すべてのフィールドが正常に保存され、希望通りに正しく動作します。
ちなみにWP-Membersを有効にした場合、予想されるとして機能していない可能性がありますので、WP-Membersプラグインを無効にするようにします。 メンバーシップのプラグインを使用する他の メンバーシップのプラグインや WooCommerce 専用メンバーシップのプラグイン(例えば、 WooCommerceメンバーシップ)の使用を検討してください。

このcssはどこコピーして貼り付けると、なるんです?
/ **
* Add new register fields for WooCommerce registration。
* WooCommerce 登録フォームに新しいフィールドを追加
*
* @return string Register fields HTML。
*/
function wooc_extra_register_fields(){
?>
*
*
*
<?php
}
add_action(「woocommerce_register_form_start '、' wooc_extra_register_fields ');
こんにちは?
コードは、テーマの関数ファイルに追加します。
https://www.thewordcracker.com/basic/how-to-add-custom-codes-to-wordpress/
参考までに、上記の文は、作成されたか、少し長くなりましたね。 最新 WooCommerce와 WordPressで正常に動作しない可能性もあります。